
test_inference_cpp.md 5.5 KB
C++预测功能测试
C++预测功能测试的主程序为test_inference_cpp.sh,可以测试基于C++预测库的模型推理功能。
1. 测试结论汇总
基于训练是否使用量化,进行本测试的模型可以分为正常模型和量化模型,这两类模型对应的C++预测功能汇总如下:
| 模型类型 | device | batchsize | tensorrt | mkldnn | cpu多线程 |
|---|---|---|---|---|---|
| 正常模型 | GPU | 1/6 | fp32/fp16 | - | - |
| 正常模型 | CPU | 1/6 | - | fp32 | 支持 |
| 量化模型 | GPU | 1/6 | int8 | - | - |
| 量化模型 | CPU | 1/6 | - | int8 | 支持 |
2. 测试流程
运行环境配置请参考文档的内容配置TIPC的运行环境。
2.1 功能测试
先运行prepare.sh准备数据和模型,然后运行test_inference_cpp.sh进行测试,最终在test_tipc/output/{model_name}/cpp_infer目录下生成cpp_infer_*.log后缀的日志文件。
bash test_tipc/prepare.sh ./test_tipc/configs/ch_PP-OCRv2_rec/model_linux_gpu_normal_normal_infer_cpp_linux_gpu_cpu.txt "cpp_infer"

# 用法1:
bash test_tipc/test_inference_cpp.sh test_tipc/configs/ch_PP-OCRv2_rec/model_linux_gpu_normal_normal_infer_cpp_linux_gpu_cpu.txt
# 用法2: 指定GPU卡预测,第三个传入参数为GPU卡号
bash test_tipc/test_inference_cpp.sh test_tipc/configs/ch_PP-OCRv2_rec/model_linux_gpu_normal_normal_infer_cpp_linux_gpu_cpu.txt '1'
运行预测指令后,在test_tipc/output文件夹下自动会保存运行日志,包括以下文件:
test_tipc/output/
|- results_cpp.log    # 运行指令状态的日志
|- cpp_infer_cpu_usemkldnn_False_threads_6_precision_fp32_batchsize_6.log  # CPU上不开启Mkldnn,线程数设置为6,测试batch_size=6条件下的预测运行日志
|- cpp_infer_gpu_usetrt_False_precision_fp32_batchsize_6.log # GPU上不开启TensorRT,测试batch_size=6的fp32精度预测日志
......
其中results_cpp.log中包含了每条指令的运行状态,如果运行成功会输出:
[33m Run successfully with command - ch_PP-OCRv2_rec - ./deploy/cpp_infer/build/ppocr --rec_char_dict_path=./ppocr/utils/ppocr_keys_v1.txt --rec_img_h=32 --use_gpu=True --use_tensorrt=False --precision=fp32 --rec_model_dir=./inference/ch_PP-OCRv2_rec_infer/ --rec_batch_num=6 --image_dir=./inference/rec_inference/ --benchmark=True --det=False --rec=True --cls=False --use_angle_cls=False > ./test_tipc/output/ch_PP-OCRv2_rec/cpp_infer/cpp_infer_gpu_usetrt_False_precision_fp32_batchsize_6.log 2>&1 ! [0m
[33m Run successfully with command - ch_PP-OCRv2_rec - ./deploy/cpp_infer/build/ppocr --rec_char_dict_path=./ppocr/utils/ppocr_keys_v1.txt --rec_img_h=32 --use_gpu=False --enable_mkldnn=False --cpu_threads=6 --rec_model_dir=./inference/ch_PP-OCRv2_rec_infer/ --rec_batch_num=6 --image_dir=./inference/rec_inference/ --benchmark=True --det=False --rec=True --cls=False --use_angle_cls=False > ./test_tipc/output/ch_PP-OCRv2_rec/cpp_infer/cpp_infer_cpu_usemkldnn_False_threads_6_precision_fp32_batchsize_6.log 2>&1 ! [0m
......
如果运行失败,会输出:
Run failed with command - ch_PP-OCRv2_rec - ./deploy/cpp_infer/build/ppocr --rec_char_dict_path=./ppocr/utils/ppocr_keys_v1.txt --rec_img_h=32 --use_gpu=True --use_tensorrt=False --precision=fp32 --rec_model_dir=./inference/ch_PP-OCRv2_rec_infer/ --rec_batch_num=6 --image_dir=./inference/rec_inference/ --benchmark=True --det=False --rec=True --cls=False --use_angle_cls=False   > ./test_tipc/output/ch_PP-OCRv2_rec/cpp_infer/cpp_infer_gpu_usetrt_False_precision_fp32_batchsize_6.log 2>&1 !
Run failed with command - ch_PP-OCRv2_rec - ./deploy/cpp_infer/build/ppocr --rec_char_dict_path=./ppocr/utils/ppocr_keys_v1.txt --rec_img_h=32 --use_gpu=False --enable_mkldnn=False --cpu_threads=6 --rec_model_dir=./inference/ch_PP-OCRv2_rec_infer/ --rec_batch_num=6 --image_dir=./inference/rec_inference/ --benchmark=True --det=False --rec=True --cls=False --use_angle_cls=False   > ./test_tipc/output/ch_PP-OCRv2_rec/cpp_infer/cpp_infer_cpu_usemkldnn_False_threads_6_precision_fp32_batchsize_6.log 2>&1 !
......
可以很方便的根据results_cpp.log中的内容判定哪一个指令运行错误。
2.2 精度测试
使用compare_results.py脚本比较模型预测的结果是否符合预期,主要步骤包括:
- 提取日志中的预测坐标;
- 从本地文件中提取保存好的坐标结果;
- 比较上述两个结果是否符合精度预期,误差大于设置阈值时会报错。
使用方式
运行命令:
python3.7 test_tipc/compare_results.py --gt_file=./test_tipc/results/cpp_*.txt --log_file=./test_tipc/output/cpp_*.log --atol=1e-3 --rtol=1e-3
参数介绍:
- gt_file: 指向事先保存好的预测结果路径,支持.txt 结尾,会自动索引.txt格式的文件,文件默认保存在test_tipc/result/ 文件夹下
- log_file: 指向运行test_tipc/test_inference_cpp.sh 脚本的infer模式保存的预测日志,预测日志中打印的有预测结果,比如:文本框,预测文本,类别等等,同样支持cppinfer*.log格式传入
- atol: 设置的绝对误差
- rtol: 设置的相对误差
运行结果
正常运行效果如下图:

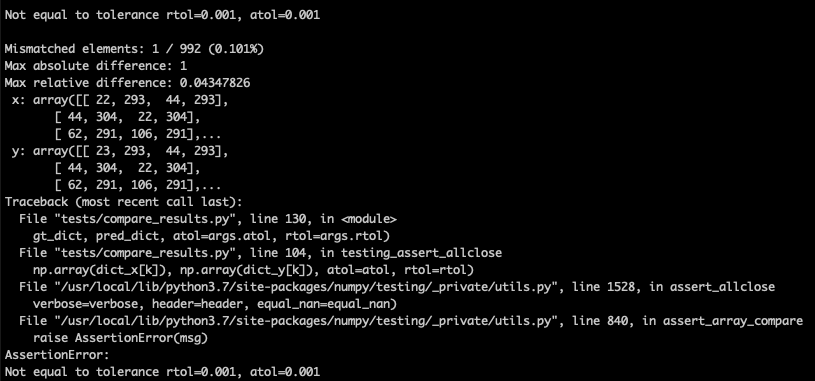
出现不一致结果时的运行输出:
3. 更多教程
本文档为功能测试用,更详细的c++预测使用教程请参考:服务器端C++预测